Sometime back I wrote a step-by-step guide for setting up PHP development environment in a virtual machine. This is a simplified (& less tiring) version of that.
You’ll need a few things to proceed:
- A computer, ofcourse. I used a MacBook Pro running OS-X Lion.
- Oracle’s VirtualBox VM software – get it from here.
- A linux distro. We will use Ubuntu Server here. Current LTS version is 12.04. Download the 32 bit ISO from here. Remember to download 32 bit version, the 64 bit version is kinda sluggish on less than 4 GB of RAM. 32 bit version is good enough for running web development stack unless you have specific needs.
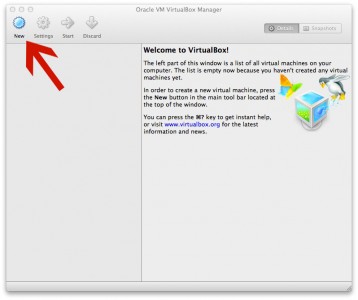
STEP 1: Install the Virtual Box and then fire it up. In the window that opens, click on the “New” icon in the toolbar.
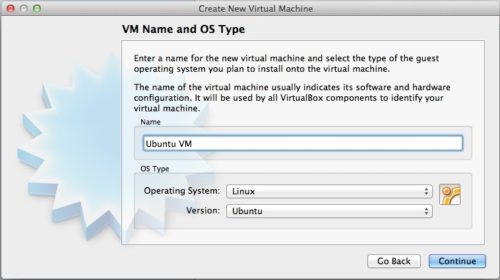
STEP 2: When it asks for VM name & type, give a name to your VM & select Linux as Operating System & Ubuntu as version. Click Continue.
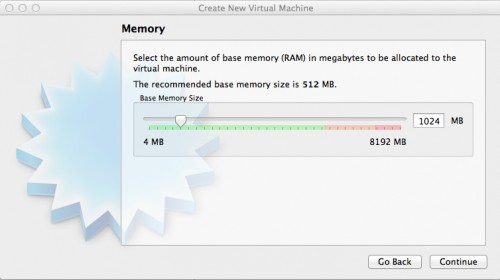
STEP 3: Allot 1 GB of RAM to the VM. If your computer has less than 8 GB of RAM then 512 MB to the VM should be fine. (You should consider increasing the RAM on your computer)
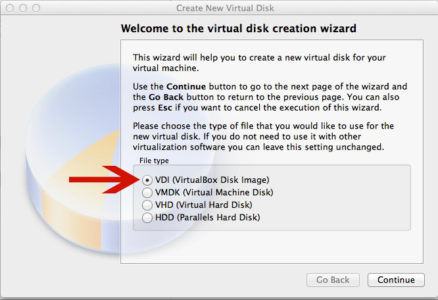
STEP 4: On the Virtual Disk Creation Wizard window, VDI should be selected by default. If it isn’t then select it & click Continue.
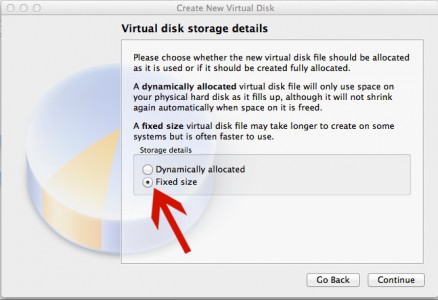
STEP 5: On the next screen titled “Virtual disk storage details”, select “Fixed Size” & click Continue.
STEP 6: On the next screen, allocate 10 GB to your virtual disk. If you don’t have much space on HDD then 5 GB should be fine.
STEP 7: Now you’ll be presented with a summary of the virtual disk & Virtual Box will set it up on your HDD. It’ll take a few minutes. You can put the coffee in the coffee maker if you want while Virtual Box is working. After its done, click the Create button & it’ll all be setup.
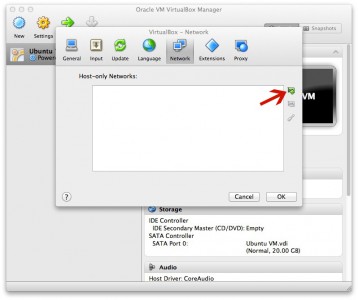
STEP 8: In the menu bar on top, go to Virtual Box -> Preferences and click the icon labelled “Network” in the window that opens. If you don’t see anything in the “Host-only Networks” box then click the first icon on the right which has a green plus (+) symbol, it’ll be the only one click-able. This will add a network adaptor for VMs to talk to the host OS, Mac OSX in my case. If the “Host-only Networks” box already has one or more items then you don’t need to do anything except move to next step. 🙂 Click OK to close this window.
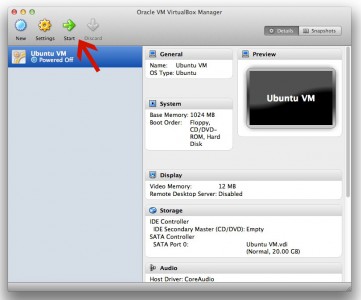
STEP 9: So now that the VM has been created, we’ll proceed to install the Ubuntu Server operating system on it. In the Virtual Box manager window, your Ubuntu VM should already be selected, click start to launch it.
STEP 10: A new window will open and after the launch sequence, you’ll see the First Run Wizard window. Click Continue.
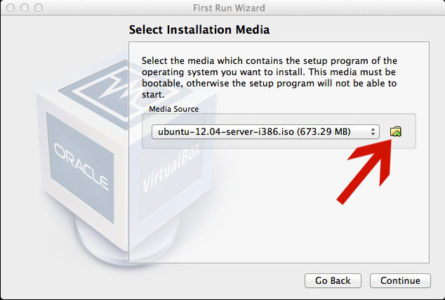
STEP 11: On the next window you’ll be asked to select installation media. Click the folder icon next to the drop down and browse to the folder where you downloaded the Ubuntu Server ISO. Select that ISO. Click Continue.
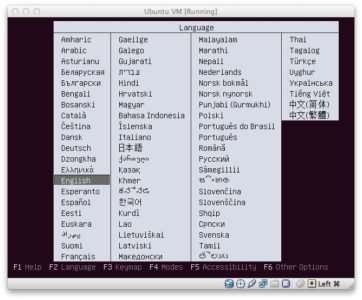
STEP 12: On the next window you’ll be asked to choose a language for the installation procedure. I chose English, you’re free to choose any other if you so wish. Hit the Enter key to proceed.
STEP 13: Now it’ll ask what you want to do. Default selection will be “Install Ubuntu Server”, hit Enter key to proceed. On the next screen it again asks for language, choose yours & hit Enter key.
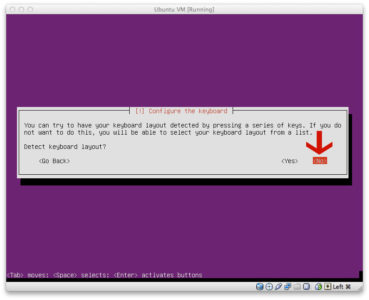
STEP 14: Now it asks for keyboard type. If you know yours then select “No”, using your TAB key to move the selection & hit Enter key.
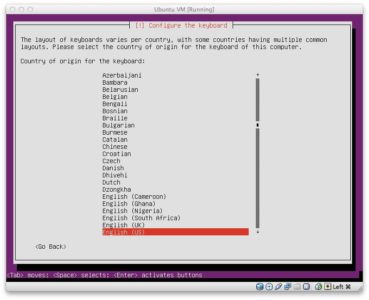
STEP 15: If you selected “No” in previous step then you’ll now see a list of keyboard options. Mine is “English (US)” so I selected that.
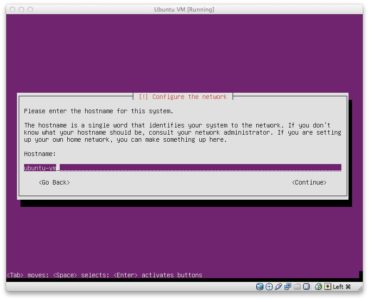
STEP 16: Now it’ll start loading up stuff. After a few seconds it’ll ask for hostname. Now this hostname is important as you’ll be using this to SSH into your VM and also to access its virtual disk for files. So enter a hostname & note it down somewhere. I gave it “ubuntu-vm” so that its easy to remember.
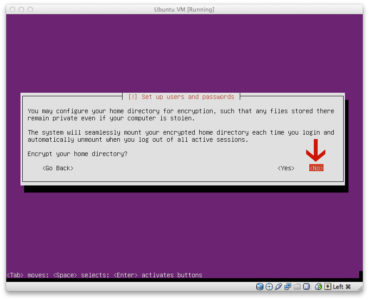
STEP 17: After that it’ll ask for username & password. Set those up & then it asks whether you want to have Ubuntu encrypt your home directory. We don’t need this here so select “No” & hit ENTER.
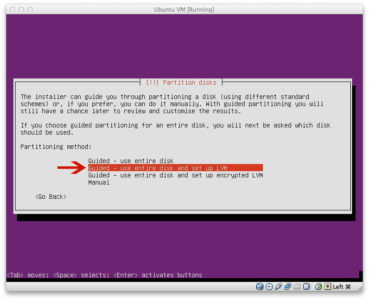
STEP 18: On the next screen it’ll ask about disk partitioning, select “Guided – use entire disk and setup LVM”.
STEP 19: On the next screen it’ll ask if you want to write partitioning scheme to disk. Select Yes to proceed. On the next screen it’ll ask the size of volume to be used, don’t change the default value & hit ENTER to proceed. On the next screen it shows the partitioning summary & will ask if you want to write the changes. Select “Yes” to proceed.
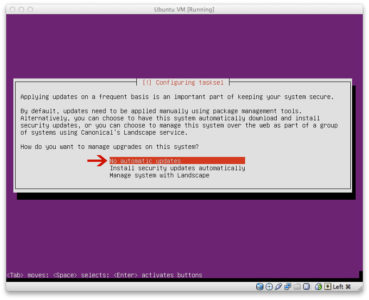
STEP 20: On the next screen it will show update options for operating system. Select “No automatic updates” & hit ENTER key.
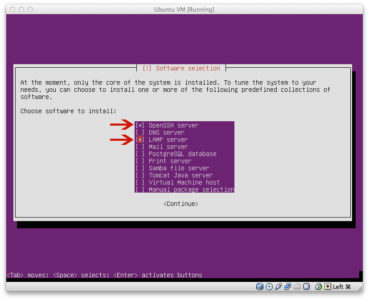
STEP 21: Next on software installation screen, select OpenSSH server & LAMP server. Use arrow keys to move up and down & spacebar to select/unselect an option. Hit the ENTER key to proceed.
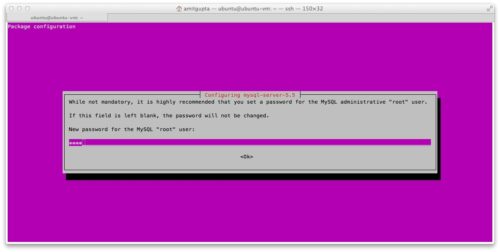
STEP 22: On the next screen it’ll ask you to set a root password for MySQL. Its a good idea to do so; if you don’t then that’s ok as well since this is just your development stack.
STEP 23: After several minutes the installation will be done and Ubuntu will reboot and present you with a login prompt. In the Devices menu on top, select Install Guest Additions. After its done, login using the username & password you chose during installation.
Open the network interfaces file via the following command:
[bash gutter=”no”]
sudo nano /etc/network/interfaces
[/bash]
When you have the file open, add following to the end of the file:
[text file=”/etc/network/interfaces”]
auto eth1
iface eth1 inet static
address 192.168.56.101
netmask 255.255.255.0
[/text]
and then press ^X (Control + X ) and then Y and then press ENTER key to save the file.
Here we assigned a static IP to Ubuntu so that we won’t have to check on every boot what IP has been assigned to it. Virtual Box assigns IPs in range 192.168.56.1xx, so unless you have another VM using 192.168.56.101, you should be fine with this IP here.
Now shut down the VM using following command:
[bash gutter=”no”]
sudo shutdown -h now
[/bash]
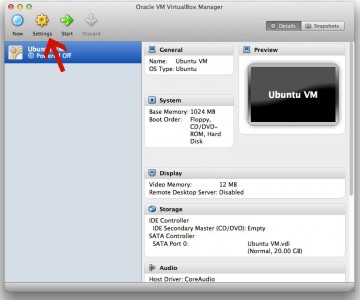
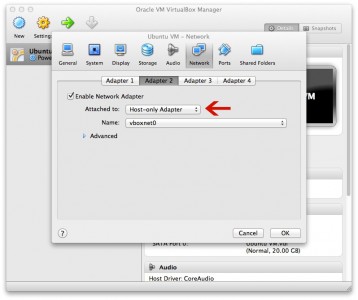
STEP 24: Now we need to setup Virtual Box network so that our VM can talk to host OS without any issues. For this we added the “Host-only network” in STEP 8 above. In the Virtual Box VM Manager, click on Settings to open our VM’s settings, then click the Network icon in toolbar and switch to Adapter 2 tab. Click the checkbox to enable it, select “Host-only Adapter” in the first drop down list. In the second drop down the adapter you added in STEP 8 should be selected by default.
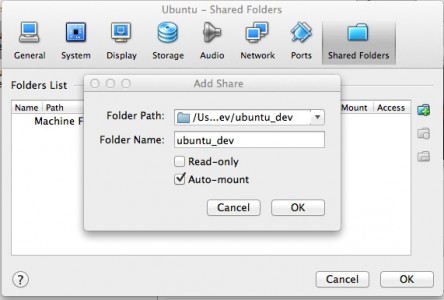
Now click on the Shared Folders icon in the toolbar. Click on the folder with plus (+) icon on the right and select a folder that you wish to be mounted in the VM and the folder name which you wish to use for it in the VM. Click on the checkbox labelled “Auto-mount” so that this folder will be mounted automatically when the VM boots. Click Ok and again click Ok.
STEP 25: Now we need to add this VM’s IP to our hosts file so that we don’t have to use the IP every time we want to connect to it. Open the Terminal & run the following:
[bash gutter=”no”]
sudo nano /private/etc/hosts
[/bash]
Add the following in the file:
[text file=”/private/etc/hosts”]
192.168.56.101
192.168.56.101 sandbox.dev
[/text]
Replace <vm_hostname> with the hostname you gave when installing Ubuntu in STEP 16. Press ^X (Control + X ) and then Y and then press ENTER key to save the file. Use the following command to flush your local DNS cache:
[bash gutter=”no”]
sudo killall -HUP mDNSResponder
[/bash]
STEP 26: Now that Ubuntu is installed & we have a hosts file entry on our host OS, we can SSH into Ubuntu VM to configure it further. Start the Ubuntu VM but don’t login there. In the terminal issue the following command:
[bash gutter=”no”]
ssh
[/bash]
Replace <username> with the username you chose in Ubuntu installation in STEP 17. Replace <vm_hostname> with your hostname. You will be told that the server is not recognized & asked if you would like to continue. Select Yes and then enter the password you chose in STEP 17.
After you are logged in, update list of available software for our ubuntu and then update all installed packages using the following commands:
[bash]
sudo apt-get update
sudo apt-get -y upgrade
[/bash]
STEP 27: Now we install the basic stuff like build-essential, module assistant, linux-headers, dkms, zip, unzip, make, curl, wget, libxml, openssl, Git and Subversion. Run the following commands:
[bash]
sudo apt-get -q -y install build-essential module-assistant linux-headers-$(uname -r) dkms zip unzip
sudo apt-get -y install php5-dev
sudo apt-get -q -y install gcc make wget cron libxml2 libxml2-dev libzip-dev libbz2-dev curl libcurl4-openssl-dev libcurl3 libcurl3-gnutls libjpeg62 libjpeg62-dev libpng12-0 libpng12-dev libmcrypt-dev libmcrypt4 libxslt1-dev libxml2-dev git subversion
[/bash]
After the installations are complete, we install Guest Additions. Run following commands:
[bash]
sudo mount /dev/cdrom /media/cdrom
sudo sh /media/cdrom/VBoxLinuxAdditions.run –nox11
[/bash]
STEP 28: Now we will configure a few things. First, we’ll add our user and apache user to the virtual box group and enable apache rewrite module.
[bash]
sudo usermod -a -G vboxsf
sudo usermod -a -G vboxsf www-data
sudo a2enmod rewrite
[/bash]
Replace <username> with the username you chose in Ubuntu installation in STEP 17.
After its done, issue the following command to open Apache configuration:
[bash gutter=”no”]
sudo nano /etc/apache2/httpd.conf
[/bash]
and add the following line to it:
[text gutter=”no” file=”/etc/apache2/httpd.conf”]
ServerName localhost
[/text]
Press ^X (Control + X ) and then Y and then press ENTER key to save the file. Then run the following to add a site to apache:
[bash gutter=”no”]
sudo nano /etc/apache2/sites-available/default
[/bash]
Add the following to the file:
[apache file=”/etc/apache2/sites-available/default”]
ServerName sandbox.dev
ServerAlias sandbox.dev
DocumentRoot /media/sf_
LogLevel info
ErrorLog ${APACHE_LOG_DIR}/sandbox.dev-error.log
CustomLog ${APACHE_LOG_DIR}/sandbox.dev-access.log combined
RewriteEngine On
RewriteLog ${APACHE_LOG_DIR}/sandbox.dev-rewrite.log
RewriteLogLevel 0
[/apache]
Replace <folder_name> with the folder name you gave for your shared folder in STEP 24. Press ^X (Control + X ) and then Y and then press ENTER key to save the file.
Now we enable this site in Apache and restart it.
[bash gutter=”no”]
sudo service apache2 restart
[/bash]
Now we enable error reporting in PHP. Open the PHP ini file using following command:
[bash gutter=”no”]
sudo nano -w /etc/php5/apache2/php.ini
[/bash]
Now press ^W (Control + W) to search and type in “error_reporting =” and on the line where it defines error reporting, set it to:
[ini gutter=”no” file=”/etc/php5/apache2/php.ini”]
error_reporting = E_ALL | E_STRICT
[/ini]
Now search for “display_errors =” and on the line where it defines display errors, set it to On. Then search for “log_errors =” and on the line where it defines log errors, make sure its set to On. Below that is the “log_errors_max_len”, set it to 0. After that, search for “error_log =” and add a new line after the comment where it shows error_log, and add following:
[ini gutter=”no” file=”/etc/php5/apache2/php.ini”]
error_log = /media/sf_
[/ini]
Replace <folder_name> with the folder name you gave for your shared folder in STEP 24. Press ^X (Control + X ) and then Y and then press ENTER key to save the file.
Now its time to configure MySQL. By default MySQL will only listen to connections from 127.0.0.1. We need to be able to connect from our host OS for easier debugging or to use with any GUI tools on host OS, so we’ll make it listen to connections from all IPs. Run the following command to open MySQL config:
[bash gutter=”no”]
sudo nano -w /etc/mysql/my.cnf
[/bash]
Now press ^W (Control + W) to search and type in “bind-address” and on the line where it defines bind-address, set it to:
[ini gutter=”no” file=”/etc/mysql/my.cnf”]
bind-address = 0.0.0.0
[/ini]
Press ^X (Control + X ) and then Y and then press ENTER key to save the file. Now login to MySQL and run the following SQL:
[mysql]
GRANT ALL ON *.* TO ‘root’@’%’;
FLUSH PRIVILEGES;
[/mysql]
Exit MySQL & restart it using the following command:
[bash gutter=”no”]
sudo service mysql restart
[/bash]
STEP 29: Now we’ll create a folder with symlinks to Apache & PHP conf files etc. for easy access. Run the following commands:
[bash]
cd ~/
mkdir _lamp && cd _lamp
sudo ln -s /etc/apache2/httpd.conf
sudo ln -s /etc/apache2/sites-available/default default-site
sudo ln -s /etc/php5/apache2/php.ini
sudo ln -s /media/sf_
[/bash]
Replace <folder_name> with the folder name you gave for your shared folder in STEP 24. Now “~/_lamp” is the folder to go to whenever you need to edit Apache or PHP config files.
STEP 30: Now we’ll install Xdebug & configure it with PHP. Run the following commands:
[bash]
cd
git clone git://github.com/derickr/xdebug.git
cd xdebug*
phpize
./configure –enable-xdebug
make
sudo make install
[/bash]
After the installation is done, which will take a bit, issue the following commands to open php.ini:
[bash]
cd ~/_lamp
sudo nano php.ini
[/bash]
Use ^W (Control + W) to search for “date.timezone” and set it to your preferred time zone. You can look up list of supported time zones here. Above “date.timezone”, add the following:
[ini file=”~/_lamp/php.ini”]
[xdebug]
zend_extension=/usr/lib/php5/20090626+lfs/xdebug.so
xdebug.remote_enable=1
xdebug.remote_connect_back=1
xdebug.remote_port=9000
xdebug.var_display_max_children=-1
xdebug.var_display_max_data=10000
xdebug.var_display_max_depth=-1
[/ini]
Press ^X (Control + X ) and then Y and then press ENTER key to save the file. Now run the following command to restart Apache.
[bash gutter=”no”]
sudo service apache2 restart
[/bash]
Now you can setup your websites/apps in Apache in the file at “~/_lamp/default-site”, keep your files in “~/_lamp/www”, import your databases in MySQL and start using the PHP development stack you just installed in your VM. One of the good things about having the webroot of the VM in a folder on the host OS is that if you use an IDE or have a favourite code editor then you can still use them all to write code and files will be saved in the VM’s webroot. :tup: And same goes for the Git/Subversion client you might already have on your host OS. 🙂
Hmm … trying to install guest additions with no success… first time it fails silently, second time I get the dreaded {VERR_PDM_MEDIA_LOCKED} error…
Sorry, I did not notice you actually install them later, on steps 27 and so on .. 🙂
Hi, going through the steps from start and finding a few hitches, hope the feedback will help make it even better 🙂 … so far, got a “default website already enabled” in step 28 (do I have to add those lines at the end of the file, or substitute them to the content of …./sites/available/default ?)
, and a “no phpize command” at step 30. so at the moment I will not be installing xdebug since I am unable to perform all steps.
also, just checking – is it correct to name the shared folder “somefoldername” at step 24 and then using it later like “sf_somefoldername” ?
will run through it all again later today …
Yeah, default site is enabled by default, I’ve removed the command from the tut above.
Need to install PHP5 dev package. Run this:
[bash gutter=”no”]
sudo apt-get -y install php5-dev
[/bash]
I’ve added this also to the tut above. :tup:
The image that shows addition of shared folder (in the STEP 24), it shows folder path and folder name. Now your folder on the host OS can be “abc” but if you set “pqr” as folder name in that dialog box, your folder will be available as “sf_pqr”. So its the name you give in that dialog box is what matters. For simplicity I’d suggest you keep same name, so if your folder on host OS is “somefoldername” then keep the same name in that dialog box & it’ll be available as “sf_somefoldername” in ubuntu vm. :tup:
Hey, great tutorial. What I’m wondering is what about testing? When I create my helloworld.php file and save it to the ubuntu_server folder I created I can access it in my virtual machine so I know it’s saving there but when I run it from my local machine I get:
Unable to load page
Problem occurred while loading the URL http://localhost/test/newfile.php
Cannot connect to destination (localhost)
So do I just need to install Apache, PHP and MySQL on my local machine. I’m running Xubuntu on my laptop if that matters.
Thanks and I appreciate the time you took to create this. Great job 😎
Leo
Have you pointed your host OS “localhost” to your VM? You’ll need to add a record in your host OS hosts file to do so, “localhost” points to same OS, so if you access “localhost” from your host OS it’ll not point to VM on its own. Refer to Step 25 above to see how to add it to your hosts file.
Secondly, you’ll need to create a vhost in Apache in your VM to point “localhost” to the directory you want (“ubuntu_server” seems to be it from your comment). Refer to Step 28 above to see how to go about it.
Hey Amit,
Thanks for the reply, I appreciate it. My bad though, What I did was in step 28 I added the code to sudo nano /etc/apache2/sites-available/default instead of replacing the code with yours. Works great now.
Thanks for this, I bookmarked for future reference 😀
Leo
Hey, so I was just wondering. Are you going to update this for Ubuntu 14.04. I’m following along for 14.04 right now to create a node environment.
I was just thinking maybe some of your readers may like that. Especially since this page ranks well for setting up a dev environment. Just a thought.
Thanks again for this. It’s my template lol
Leo
I don’t think an update is needed because other than grabbing the 14.04 iso (instead of 12.04) for installing Ubuntu in VM, the steps would remain same. Or have you run into issues which need different approach than the way its done in here?
Ya, on step 28 there is no longer just a default file, there is now 2 files; 000-default and default-ssl.
Also in the newer versions of Apache “RewriteLog” is unsupported.
I think everything else is about the same.
Cool, good to know! :tup:
I am using 14.04.1 and getting “You don’t have permission to access / on this server.” issue on http://sandbox.dev/ from host OS. I checked all permissions and I have no idea what I’ve done wrong 🙁
I fixed it adding another with “all granted” record for /media/sf_/ to apache2.conf.